MarkLogic on Azure
Quick Start Guide
Overview
In MarkLogic 9, we are partnering with Microsoft team to help you deploy MarkLogic clusters on Azure cloud. We provide an officially supported MarkLogic Azure image and recommendations for your deployments. Following the release, MarkLogic will be releasing an Azure Solution Template to set up your MarkLogic clusters in a few clicks. MarkLogic has a strong track record of running in development and production environment with major cloud providers, and this will continue to expand MarkLogic’s capabilities in the cloud.
In addition to officially supporting MarkLogic on Azure platform, many MarkLogic 9 features are designed for a better and easier deployment and management on cloud platforms. With new security features such as Encryption, Redaction and Element-level Security, MarkLogic is designed to securely host your data on public cloud environments. Please refer to security guide on the new features in MarkLogic 9. In addition, MarkLogic introduces a new support work flow through the Telemetry feature, which aims to shorten resolution time by making system level log, metering and configuration data accessible as soon as you reach MarkLogic Support. This new support workflow increases the availability of your applications in cloud environments.
Why It Matters
For many organizations, moving data and applications to cloud environments are among their most important IT initiatives in the next five years. Seeing the needs and requirements from our customers, we are enhancing the features and functionality that make MarkLogic easy and secure to deploy in the cloud.
Recognizing that there is variance in architecture, hardware and software layers, and service offerings that are available with different cloud platforms, MarkLogic is keen to enable you to run on the public cloud of your choice. We believe that the step towards our official partnership with Microsoft Azure and the options available for MarkLogic cloud deployments will help to shape your IT roadmap for the future.
Where To Focus
In this quick start guide, the following examples are provided for using the Azure MarkLogic Image from Marketplace:
- Access an Azure image with MarkLogic 9 on Microsoft public marketplace
- Deploy a single node MarkLogic cluster with load balancer setup
- Load contents
- Manage and Scale MarkLogic clusters manually
Concept Guides
To familiarize yourself with Azure concepts and terminologies, here is the link to the Azure concepts: here .
The concept section here consolidates information around the following topics: Azure-endorsed Distributions, Regions and Availability, Storage, Networking, VM Scale Sets, Containers, Resource Manager, Azure Linux agent, Azure Security Center, Disaster Recovery, Planned Maintenance, VM sizes, Deployment Considerations.
The concept section provides a comprehensive overview for the Azure platform.
Deployment Options
In the Azure environment, you can deploy virtual machines (VM) from the published MarkLogic Azure Image, and add the storage, networking and security pieces; or you can use solution template to setup the IT environment via infrastructure as code concept. This guide focuses on the former method.
Environment Setup
Example 1 – Deploy a single node MarkLogic instance on Azure
In order to run MarkLogic, it is recommended to run on a virtual machine with at least 4 cores. For production environment, Premium storage disks in Azure are preferred. Please note that different VM instance types in Azure may support different storage types. For MarkLogic 9 Azure image, it is required to choose a virtual machine which has more than 2 GB of memory. Please also read the installation introduction , regarding Memory, Disk Space and Swap Space and Transparent Huge Page here .
System Requirements and Installation
Prerequisites:
You will need to setup your Azure account before proceeding to next steps. After setting up the account, you can find your subscription ID under “Subscriptions”.
How to find MarkLogic Azure Image?
Navigate to Marketplace for Microsoft Azure marketplace and search for MarkLogic. Depending on your needs, choose the developer edition and bring your own license (BYOL) edition. Then click on “create” at the bottom of the page. You will be directed to the portal for creating the virtual machine.
You will go through the following five steps to create a CentOS VM with MarkLogic 9 installed:
Step 1: Configure Basic Settings. Enter appropriate information for your VM instance. See screenshot below:
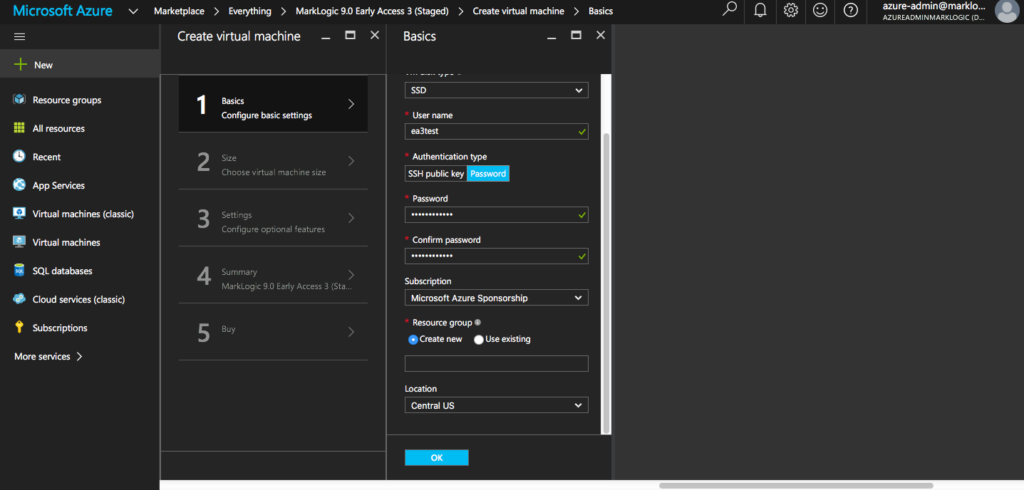
Hit “OK” after entering your Virtual Machine information.
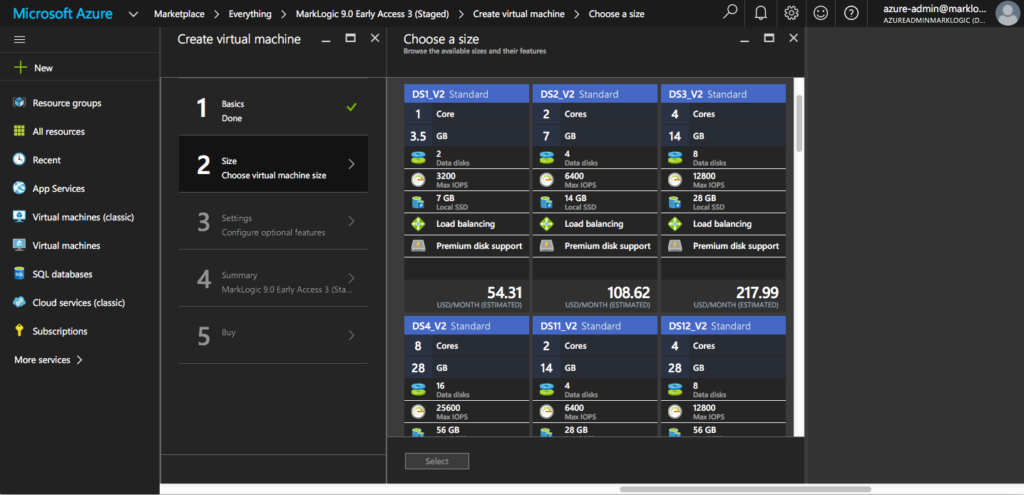
Step 2: Choose virtual machine size. Refer to the screenshot below. To see all of the available virtual machines, click on “View all”.
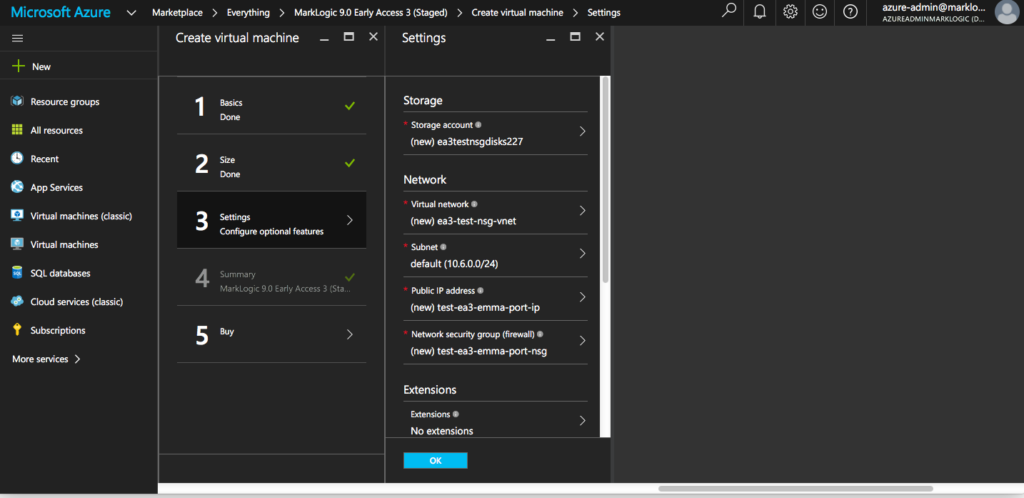
Step 3: Configure optional features. This is where you can choose Storage, Network, Extensions, High availability, and enable Monitoring. Click “Ok” when you are done configuring the optional features.
Step 4: Review the virtual machine summary. Edit details if you need to modify before proceeding to Step 5.
Step 5: Review the offer details and click on “Purchase”. For developer edition, it requires a MarkLogic developer license. You can use your existing licenses for BYOL edition.
Now you can wait a few minutes for the virtual machine to start up.
It is recommended to assign a public DNS name to your virtual machines. Here is the link to the instructions .
How to access MarkLogic
After the Azure VM is up, navigate to “Virtual Machines” tab on your Azure portal and click on the VM you just created. You can find the IP address there for accessing the MarkLogic Admin Console at port 8001.
Note: In the MarkLogic Azure image, the following ports are open by default: 8000, 8001, 8002, 7997.
Example 2 – Attach Data Disks
To preserve your database data running on MarkLogic server, you will have to attach a persistent data disk to your Azure VM in case of VM re-provisioning. Read this page to find out more on different types of disks on Azure. In addition, we recommend you to read the FAQs on Azure managed disks, as the platform recommends using managed disks over unmanaged disks for new VMs.
The steps for attaching data disks to your VM from the Azure Portal can be found here . After you go through the steps on the portal, please follow the instructions under the section “Initialize a new data disk in Linux” from this Azure tutorial .
Microsoft Azure Storage is the back-end to store virtual machine disks and has two main SKUs regarding performance. The Premium storage SKUs provide high-performance, low-latency disk support for I/O intensive workloads, whereas the Standard storage based SKUs offer a better price/GB ratio. Depending on the Virtual Machines you use, some Virtual Machines support attaching Premium Storage whereas others do not. In addition, Microsoft Azure provides unmanaged and managed disks in each of the two performance tiers. Azure has recommended managed disks for new VMs and convert your previous unmanaged disks to managed disks, to take advantage of the many features available in Managed Disks.
MarkLogic Tiered Storage feature allows you to take advantage of many Azure Storage types. The most used data that requires faster access can be placed on Premium Storage based VM data disks. The less used data can be placed on Standard Storage based VM data disks, taking advantage of the cheaper price. If you are considering leveraging MarkLogic’s Tiered Storage capabilities with different Azure Storage types, please read the following discussion on scalability and performance targets .
Example 3 – Configure a Load Balancer
Regarding network configuration, it is a good practice to use a network load balancer between the client applications and a MarkLogic deployment. Depending on your deployment topology you may use either an internet facing load balancer or an internal load balancer.
The internet facing load balancer should be used in a scenario where a client application needs to access a MarkLogic deployment using public internet IP addresses. The Azure documentation has step-by-step details about how to create an internet facing load balancer . You should also consider network security in Azure for this type of deployment.
The internal load balancer should be used in a scenario where the client application is able to access a MarkLogic deployment using internal IP addresses, or the client application is running on premises and a secure VPN connection is established between the two networks. The Azure documentation has step-by-step details about how to create an internal load balancer .
The load balancer detects proper running of MarkLogic via the HealthCheck App Server on port 7997 and will only direct traffic to that node if it has verified that the MarkLogic instance is up and running. Therefore, the Load Balancer Probe in Azure for MarkLogic is 7997 for HTTP.
Using MarkLogic
Example 4 – Load Contents
To load contents into your MarkLogic server in Azure, please refer to the guide for Loading Content Into MarkLogic Server .
In addition, these are some fun semantic exercises to try from MarkLogic’s developer site: click here .
Managing and Scaling MarkLogic on Azure
The following examples address aspects of management and scaling for MarkLogic on Azure.
Example 5 – Add a node to the existing cluster
To add more virtual machines as additional hosts for MarkLogic Clusters on Azure platform, set up the number of VM instances as needed from your Azure portal. Follow the instructions here to join a cluster for each of the node: adding a host to a cluster .
Since the IP address for each node changes as you start and stop an instance on Azure, please make sure that the public DNS name is assigned to every node before stopping an instance so that this node can join the cluster again. For adding a DNS name, Here is the link to the instructions .
Example 6 – Remove a node in the existing cluster
Follow the steps to remove a node from a cluster: leaving a cluster
Example 7 – Resize Virtual Machine
Recommendations on changing VM instance sizes can be found in this Azure blog .
Note that in all scenarios for resizing virtual machines, there is downtime for the virtual machines. In addition, data stored in temp OS disk will be lost during resizing.
Example 8 – Monitoring
- Single VM Monitoring on Azure
Azure has built-in single VM monitoring, and you will be able to see the VM status similar to the following screenshot:
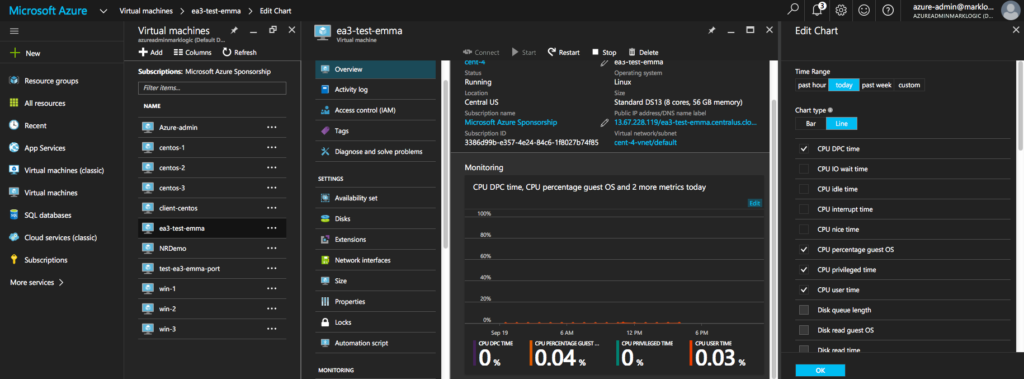
You can edit the charts with desired performance metrics.
- MarkLogic Monitoring Features
MarkLogic includes a pre-configured monitoring dashboard, a Management API that allows you for custom integration, and a recently published New Relic Plugin and App Dynamics Plugin . For details on monitoring MarkLogic server, please refer to the Monitoring Guide .
MarkLogic 9 Feature Interaction
Example 9 – Enable Telemetry
Telemetry is a MarkLogic 9 feature which introduces new support work flow for MarkLogic customers. For cloud environments, Telemetry will shorten support case resolution time and ease your concern for deployment. Read more on Telemetry and turn on the feature in your Azure environment.
Sponsored by MarkLogic